Visiting the US during COVID – part 3 – Orlando

An extra post for those folks who, like us, have spent a few vacations in Orlando, the home of the Mouse and theme parks generally.

Things have changed a bit since COVID, for obvious reasons. There aren’t as any flights in and out, for a start, and I suspect with the latest COVID variant the number of folks visiting may well drop again.

Masks

There isn’t a state-wide or even city-wide mask mandate, but you will find a majority of restaurants and stores at least request masks, and a sizeable percentage of staff wear them. As far as theme parks go:

  • Disney require masks in all indoor venues and request them elsewhere.
  • Universal request, but do not require, masks.
  • Sea World likewise request masks but do not require them.

Places

Don’t expect everywhere you’re used to to be open. Particularly, a number of restaurant chains are closed, and (perhaps more usefully) you’ll find its a lot easier to get a table as a walk-in at many of the International Drive restaurant venues than you’re used to!

Those mainstays of budget British tourist breakfasts, Ponderosa and Sizzlers, are largely permanently shut, though. There’s one of each near Disney on W. Irlo Bronson, but the dozen or so that used to be absolutely rammed every morning around International Drive/Universal Drive are gone, possibly for good. I suspect that the business model relied on buffet breakfasts, and with the absence of tourists AND the fact that buffets are hard to keep COVID-safe, they were in trouble.

COVID Testing

You will, as noted in the previous post, need a lateral flow/Rapid Antigen test to get home. If you failed to arrange this before you leave (for which there’s now really no excuse) it won’t be cheap (we saw prices up to $179). Remember you need documentary proof of the result to show or upload to VeriFLY, so you can’t just buy and self-administer an over-the-counter one. There are a few places of note:

  • At Orlando Airport: mcocovidtests.com will do tests: note that this link takes you to a ‘you’re in the EU’ holding page over in the UK, but to a more useful page in the US. Book at least a week ahead, and they aren’t cheap.
  • The Florida Mall on Sand Lake has a drive-thru test station in the SW corner of the carpark – see https://www.covidclinic.org/orlando-fl/ for details. Again, book a few days ahead.
  • You can, as with Breathe Assured in the UK, do a tele-health test. The likes of Azova will do the video observation for $20 as long as you can source the right brand of test.
  • A number of local health care centres will test you and email the results. We ended up using Paramount Urgent Care on Turkey Lake Road (across the carpark from the big Walmart), who tested us as walk-ins at 10am and had results in email by mid-afternoon. Friendly and helpful, but do charge $100 a head (you’re a captive market, live with it!).

Left Luggage

If you need to be able to leave your bags for the last day, Virgin’s Disney Springs’ (formerly Downtown Disney) check-in is now back open again if you fly with them.

If (like us) you’re going elsewhere for a day at the end of your trip, we can thoroughly recommend HoldMyBaggage. They have a desk on the B side at level 1 in Orlando Airport (to the left of Dollar), where you can drop bags, or they will pick up and/or drop to your accommodation. Lovely friendly people, and we thought $6/day/bag for not having to lug three cases around Raleigh, NC for the night we spent there was money well spent.

Posted in COVID Travel | 1 Comment

Visiting the US during COVID – part 2, getting home again

This post covers the UK regulations as of 0400 GMT on 7th December 2021, and the US regulations as of 0501 GMT on 6th December 2021. As such, they are subject to change at the whim of the UK Government, the US CDC and viral mutations, and I (as the author of the post) accept no responsibility should they be incorrect due to my error or you following them without checking whether the rules have changed since.

Please double-check the current regulations, and keep tracking them, well before you fly. If you’re going somewhere other than the US, the regulations covered in this post do not apply to you, but the second one (getting home again) will.

Also please note, this post is not for debate on the rights and wrongs of testing, lockdown, required wearing of masks, COVID passports etc, and anything that isn’t useful information or questions related to the process of getting in and out of the UK will get summarily deleted. And, once again, I am not a doctor or legal expert. This post is to give you pointers on where to look and what happens, nothing more.

With that in mind:

Getting home again

On your way home, you are subject to the UK‘s entry rules. Specifically, you’re going to need two (yes two) COVID tests and you have a form to fill in. The following applies to any NON-Red List country (see the regulations for details) such as the USA.

Pre-departure test

According to the regulations, this can be a Lateral Flow, Rapid Antigen or PCR test, and you must take it two calendar days or fewer before you fly out (i.e. if your flight is on a Wednesday, you must take the test sometime on or after the Monday). And, most importantly, you need documentary proof, so a self-administered test won’t work without some extra legwork.

Your basic options:

  • By far the best is to take a test with you from ExpressTest or similar: you will need a device with a video camera and an internet connection while you’re in the US.

If you forget (or like us you didn’t have a crystal ball!) you can….

  • Find a local healthcare clinic or testing station that will take self-pay patients and get you the results by email before you need to leave. These can cost $100 in the likes of Orlando (you’re a captive audience!).
  • Many, but not all, branches of Walgreens will do you a test.
  • You can, as with Breathe Assured in the UK, do a tele-health test. The likes of Azova will do the video observation for $20 as long as you can source the right brand of test from a pharmacy locally or online. Don’t forget to allow for delivery times.

With your results in hand you can upload them to VeriFLY or print them off/save them to your phone ready for check in

Day 2 Arrival test

This one requires pre-planning, ideally before you even leave the UK: you need the reference number of the test you book for the Passenger Location Form (next step below) before you leave the US.

The Day 2 test now needs to be a PCR test – lateral flow will not cut it after 7th Dec – taken on or before your second day in the UK, with your landing day counting as day ZERO. If like us you land in the UK on a Sunday, you must take the test on or before Tuesday, and you must self-isolate until you get a negative result. Note that you CAN therefore take it on the day you land.

Best tip is to book it before you leave the UK. Your airline will probably recommend a few options, and these tend to fall into the approach of mailing you a test kit that you self-administer and send back. The obvious drawback here is that you’re going to have to self-isolate until the results come through, but you don’t have to worry about dealing with it when jet-lagged if you don’t need to be back at work the day after you land.

If you do need to be working ASAP, or you just want the whole thing over with, you have options to take advantage of the ‘on or before’ bit of Day 2 tests.

  • ExpressTest will let you pre-book a test at their testing stations on many UK airports (including Heathrow, Gatwick, Birmingham).
  • HaloVerify have a testing station in the Sofitel off the right-hand end of T5 Arrivals, for which again you have to pre-book. We can throughly recommend the latter – results before we went to bed the same day from tests after we landed at 2pm – it does require a phone app, though. Also, if you don’t like throat/nasal swabs, it’s a saliva ‘spit and go’ test (this can, though, be harder than it seems if the plane’s air-conditioning has dried your mouth and throat out – it’s harder than you think to provide 2ml of saliva). Also, you need to not eat, drink or smoke for 30 mins before.
  • HaloVerify can also send you a test kit (as above) to self-admin and send back if you want.

Passenger Locator Form

This is a UK Government form you will need to fill in before you head home, a) to assert you’ve been tested etc and b) to allow them to trace your contacts on the flight etc.

Be aware that you will need your Day 2 test reference (which the testing company will send you when you book) before you fill it in, and also that it can only be filled in 48 hours (NOT two calendar days, just to be irritating) before your homeward flight’s scheduled departure time. It can be done on a smartphone.

Once you have completed it, a copy will arrive in your email as a PDF with a barcode which you can scan into VeriFLY or show to the check-in desk. We printed a copy to be safe, but weren’t asked to produce it.

On the day

Once you have your pre-departure test result, your PLF and a test booking for when you get home, you’re sorted. As on your flight out, be ready to show all your documentation (or VeriFLY) to the check-in desk….

… and remember to keep enough charge in your phone in case you have to show your PLF on arrival, or find your test booking number/complete your test details for an on-airport test!

Posted in COVID Travel | Leave a comment

Visiting the US during COVID – part 1, getting out of the UK

Last week we took a week’s break in Orlando, and as such had to navigate the whole process of testing and paperwork to get out of the UK and back again.

This post covers the UK regulations as of 0400 GMT on 7th December 2021, and the US regulations as of 0501 GMT on 6th December 2021. As such, they are subject to change at the whim of the UK Government, the US CDC and viral mutations, and I (as the author of the post) accept no responsibility should they be incorrect due to my error or you following them without checking whether the rules have changed since.

Please double-check the current regulations, and keep tracking them, well before you fly. If you’re going somewhere other than the US, the regulations covered in this post do not apply to you, but the second one (getting home again) will.

Also please note, this post is not for debate on the rights and wrongs of testing, lockdown, required wearing of masks, COVID passports etc, and anything that isn’t useful information or questions related to the process of getting in and out of the UK will get summarily deleted. And, once again, I am not a doctor or legal expert. This post is to give you pointers on where to look and what happens, nothing more.

With that in mind:

Getting out of the UK to the US

For this, you are pretty much going to need a smartphone, or wind up carrying boatloads of extra paperwork. Also note that this bit is a matter of complying with the current US regulations, not the UK ones.

Vaccination status

You need to be fully vaccinated against COVID-19. See here for details. (There are exemptions, which are covered there.)

You will need to be able to prove this on check-in, for which you are going to need either paper proof or a barcode that the airline can check. Both of these can be obtained via the NHS, either online or via the NHS App (NOT to be confused with the NHS Covid App!)

Side note: some venues in the USA require physical paper proof of vaccination, so it may be worth printing this off come what may.

VeriFLY

A number of airlines now use the VeriFLY app to consolidate your travel documents: if yours does (BA, Aer Lingus, American, etc), you can set up a profile and a trip on the app to store all your records for that trip. It will allow you to scan your vaccination pass barcode (you want the one that’s proof of your second vaccine) or upload the documentation.

Getting tested

The other main thing you will need is a lateral flow/rapid antigen/PCR test taken within ONE DAY of departure (or proof that you have recovered from COVID-19 in the last 90 days). For clarification, that means the documentation for your test must show a test time of the day of, or the day before, your departure, NOT necessarily within 24 hours. Yes, that’s pretty tight, and it’s going to cost you 30-50 quid or more per head. For US flights you are going to want to do this the day before.

A normal self-test is not enough, unless you can book a ‘tele-health’ service to monitor your test and provide you with independent documentary proof. We did this using Breathe Assured, who send you a Rapid Antigen test (or tests – they’ll do your group as one appointment) in the mail, and then provide a nurse-supervised testing process over a 30 minute Microsoft Teams call, and documentary proof via email before the end of it. (They use the FlowFlex test, which has the pleasant advantage of not requiring the nasal swab to be inserted all the way to your brain to test :D)

If you don’t use a tele-health service, you are going to have to find a testing service with a local clinic that will administer the test and deliver you a same-day result. Google for uk pre departure covid test, or check your airline’s recommendations page – British Airways in particular have discount deals with a few.

Side note: make sure your test provider’s email (in our case customerservices@breatheassured.com) is set to bypass junk mail filters 馃榾 You really do not want to be panicking about where your results are on the morning of your flight!

VeriFLY

Once again, you can add your test result to VeriFLY as part of your trip – you may need to learn how to manage files on your phone to do so, as they require you to upload the proof of testing, which they will process in a couple of hours. They will also ask you to answer a short list of questions that boil down to ‘no I don’t have symptoms, yes I’ve done all the paperwork’, and then you get a nice ‘Ready to Fly’ pass on your phone you can wave at the necessary people.

On the day

So, at this point you should have passport, boarding pass, proof of vaccination and proof of a negative test within the last calendar day. You should be good to go.

Check-in will be a little bit longer, as you will need to prove the COVID-related bits of your status. This is where VeriFLY really scores as you just need to wave the appropriate screen of the app at them, and since BA and American use it and are probably the main airlines likely to be taking you to the US, you should be laughing,

The responsibility for checking you’re fit to fly seems to fall with the airline on the departure side, but keep VeriFLY/your paperwork handy just in case US immigration ask you anything.

Masks

You will be required to wear a mask from the moment you set foot in the airport till you leave again at the other end, unless you have proof of a medical exemption or you’re actively eating or drinking. Take several, as you’re going to want to swap every few hours for a fresh and dry one. Also, many locations in the US will require you to mask up as well.

Posted in COVID Travel | Leave a comment

Getting your Instagram feed to Discord

Not so long ago, it was possible with a bit of effort, a third party feed generator and a Discord bot, to get Instagram to feed new images from your page to a Discord channel, complete with image preview. This then stopped working because as far as I can tell Instagram’s /p/<post> link is now behind their login wall, so anonymous feeds can’t get it. Result, lots of ugliness on my Discord, viz:

This bugged me enough to find a better solution, and one of my co-admins suggested IFTTT: some Googling later I found the bones of a recipe, which didn’t work. So here’s the result of me fixing it.

Step 1: create a Discord Webhook

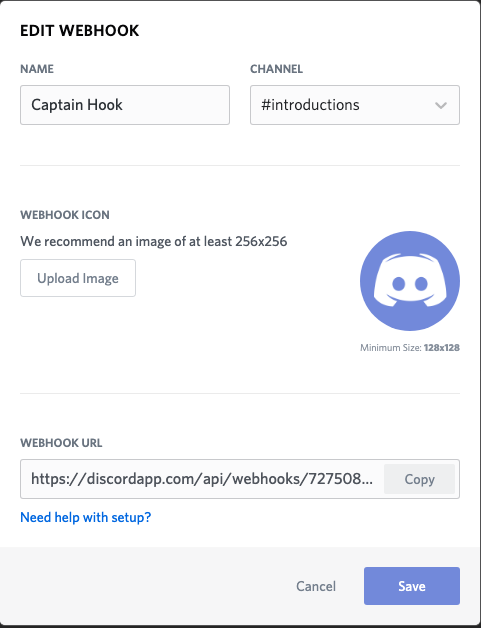
Go to Server Settings (c’mon, you should know where that is by now), Webhooks, and hit the blurple[1] Create Webhook button.

Fill in the fields, upload an avatar image for the webhook if you want. Most importantly, you need to pick which channel you want the webhook to post to, and then copy the webhook URL (keep it private) and hit Save.

Step 2: use IFTTT to scrape your Instagram feed

Go to IFTTT, hit Explore, scroll down to Make your own from scratch. then hit Create. Hit +This, search for Instagram, select it and pick one of the triggers (I chose ‘Any new photo by you’). Easy.

Step 3: feed it to Discord

Now hit +That, and search for Webhooks – there is only one result, and from there only one action (‘Make a web request’), so select it. Now you need to configure it.

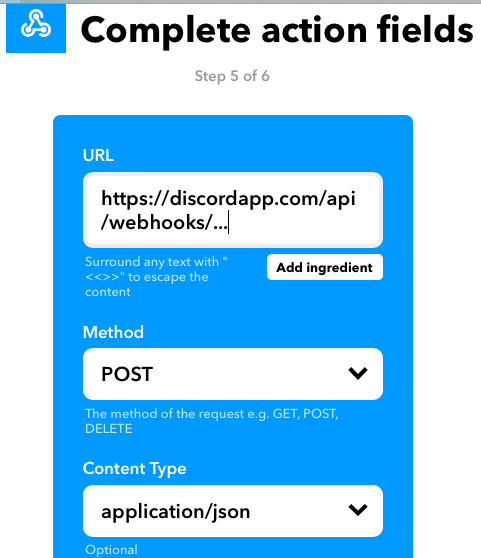
Easy bits first – paste your webhook URL into the URL field. Set the Method to POST, and the Content Type to application/json.

Finally, copy this into the Body field (or use the Add Ingredient button to add the Caption, Url and SourceUrl ingredient tokens):

{
  "content": "{{Caption}} {{Url}}",
  "embeds": [
    {  
      "image": {
        "url": "{{SourceUrl}}"
      }
    }
  ]
}

Hit Save. Go post to your Instagram feed and wait.

And there you are!

[1] ‘Blurple’ is the name of Discord’s official button colour

Posted in Virtual un-distancing | Tagged , | 10 Comments

Virtual Un-distancing and De-isolation #4 – Video Chat 1

It is, eventually, kinda nice to see people’s faces, and a voice on a phone or a line of text is only so good. There are quite a few solutions out there. Let’s mention in passing some of the more long established ones:

  • FaceTime – if you have an iPhone, or even a Mac with a webcam (most of them these days), then you’re set
  • Skype – if you’ve been using this already, then no reason not to carry on
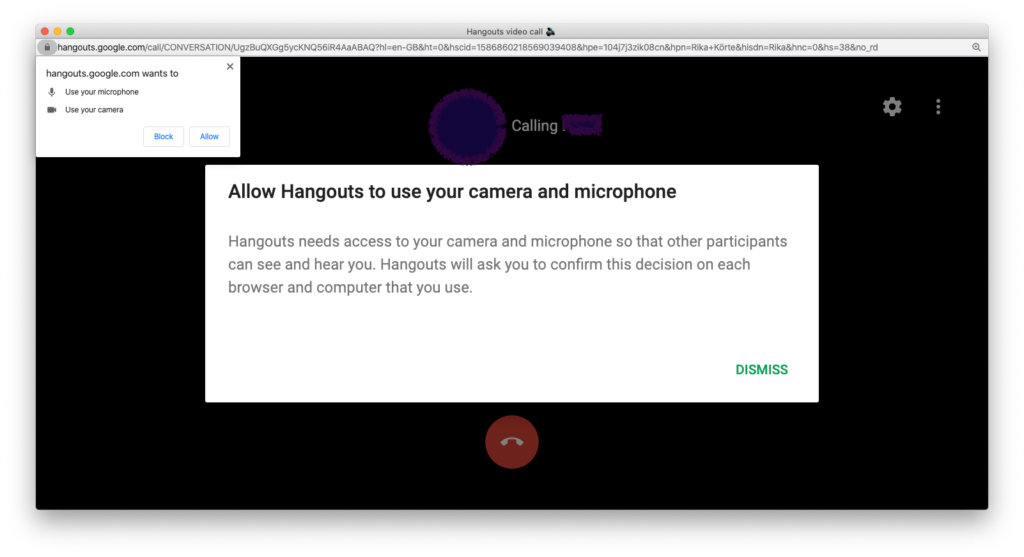
  • Google Hangout – again, if you use Google Talk regularly, then you can add video to your text chat just by clicking on the little camera icon and allowing the browser to access your camera, like so…

If you’re on your phone, I’d recommend at least headphones, as this stops the sound from your speakers getting back into your mic, which tends to either a) cause nasty feedback or b) cause the people at the far end of your call to hear themselves delayed by the time it takes for sound to get from them to you and back, which is really off-putting. We’ll talk about better approaches to sound in another post, but headphones of some sort are probably a bare minimum. (Some apps do have clever noise-cancelling software to combat the whole hearing yourself on someone else’s mic thing, but in general? Headphones.)

Next choice, and obviously, if you’ve been following the previous posts, you’ll be wondering how long before I got there, is Discord.

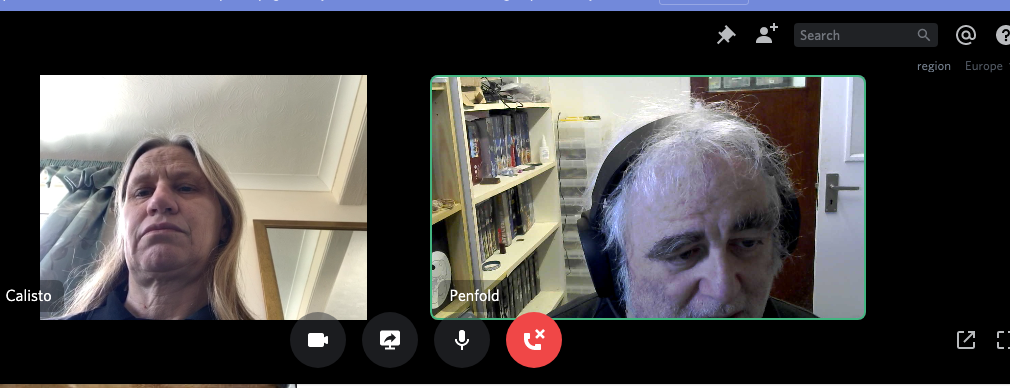
Discord Voice channels are just that – voice only – but you can do video chat with someone you’re having a Direct Message conversation with now optionally video as well. You’ll find when you connect to a ‘voice’ channel there’s a big ‘Video’ button now!

In Direct Messages, just select the video icon (or obviously the phone icon if you want voice only)… and hey presto. Like a lot of video chat tools, you have the option to screen share as well.

It’s also worth noting that you can create group chats with up to 10 people: click on the + next to Direct Messages in the sidebar and you can add friends to a group chat.

…thank you to my wife Anne for being online for once….

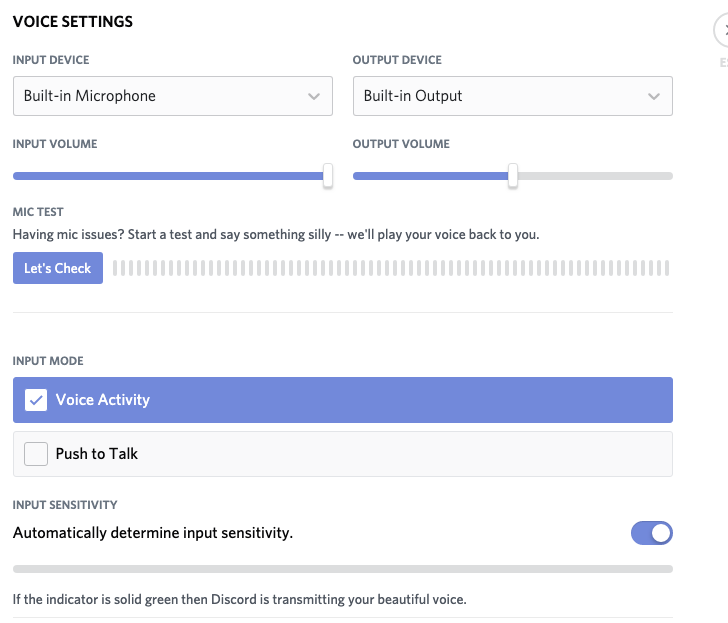
There are a bunch of settings you can tweak – go click on the gearwheel icon bottom left by your account name, and find the Voice and Video section.

First up, the audio bit: if like me you have a headset, you can switch to that rather than speakers (mine plugs into the iMac’s audio socket, which handles both). You can choose push to talk (another common feature on video chat these days), which means the spacebar acts as a transmit switch.

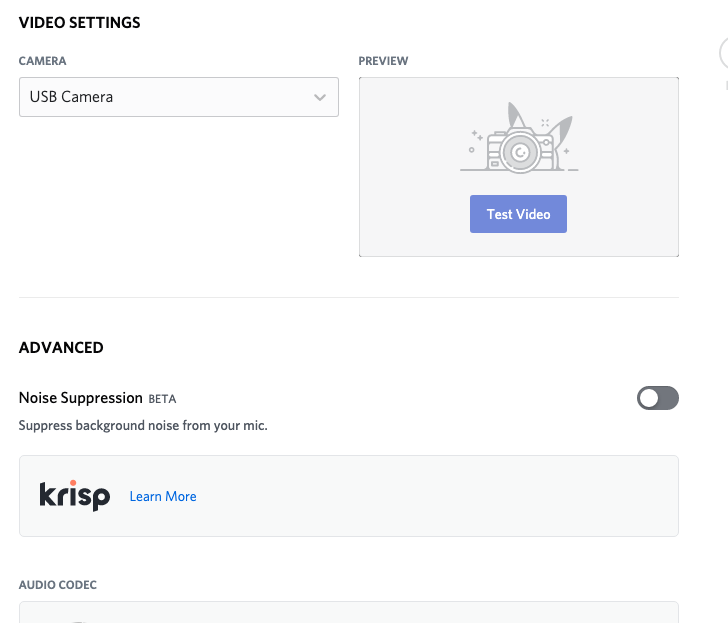
On the video side, you can choose your webcam (I have two, as my iMac is off to one side so I tend to use a second one on top of my second monitor). In Advanced settings, there’s a bunch of stuff you probably won’t need to touch for ordinary talking (and indeed, the default noise cancelling is pretty good at keeping noises from your speakers out of your microphone), but if you’re trying to feed audio from something more complex (like music) you might.

Next post, some of the more serious video conferencing options: Zoom, and new kid on the the block, Jitsi. And you may get to hear me vent on the subject of Microsoft Teams.

Posted in Uncategorized | Tagged , | 1 Comment

Virtual Un-distancing and De-isolation #3 – Discord bots

Bots, for those not in the know, are handy bits of software that do assorted clever things in response to user interaction with them in Discord. They can do as simple as ‘spot a new arrival and send them a welcome message’, through ‘give someone a role if they like a certain post’ to ‘roll dice’, and a whole range of other things,

I’m going to kick off with a couple of the more popular ones: first up, MEE6. MEE6 does a bunch of handy stuff, like welcome messages, etc, and if your server grows at all, it’s probably worth having.

Here’s what you see if you go to MEE6’s home page. Click on Add to Discord, and you will see a list of all the servers you administer (you need to be an admin here), and a button to Setup MEE6. Click the appropriate one, and you’ll get this dialog:

Make sure the right server is selected. and click Continue.

This will take you to a confirmation screen (which tells you the rather scary list of permissions MEE6 is going to get – you can trust it), and then to a screen to prove you aren’t a robot.

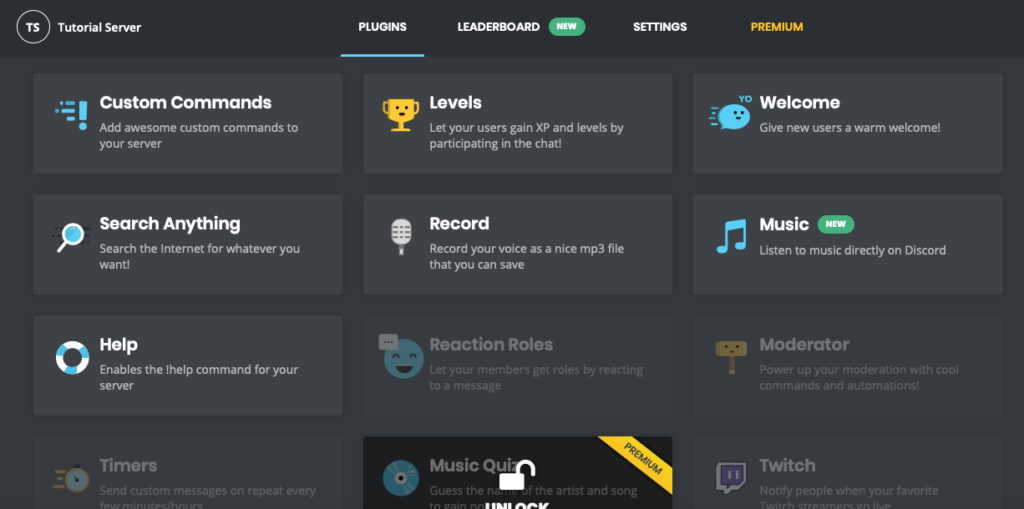
Once you’ve proved you’re at least human enough, you will find MEE6 has arrived on your server, and you’re at the Plugins tab of the config screen in your browser like this:

Here you can start to set up various MEE6 features. Let’s start with a welcome message: so click on Welcome. Your options here include:

  • Send a message when a user joins the server
  • Send a private message to new users
  • Send a welcome picture

Click the slide button to enable the one you want, type your message or add your picture, and away you go (click on Plugins to get back to the main config screen). Most of the bot really is that simple.

Unless you enjoy keeping track of who’s talkative on your server, I’d suggest turning off the Levels plugin – just click on it, click the yellow Disble button. You might want to turn ON the Moderator plugin, depending on your audience: it allows you to detect and block various things like bad language, spam etc.

If you enable the Reaction Roles plugin, you can automatically grant a Role to people who react appropriately to a post: this is particularly useful if your server has channels not everyone is interested in, in which case you can make them private and use this plugin to save you having to add people to the appropriate Role.

Have a play – you can’t do much damage while you’re exploring what the bot can do. There are also LennoxBot and Dyno, which do very similar things.

Ok. Next up, DiceParser – if you’re running a server for any kind of games that need dice, this is very handy. Go here and click Invite to invite it to your server. The process is the same as before as regards the invitation process. It’s quite a complex bot (full docs are here) but, for example, if you say “!3d6” where it can hear you, it’ll roll 3 six sided dice and give you the result.

However, and this is probably true of a LOT of bots, people will play with it just for fun and it can get a bit spammy after a while, so here’s a way to keep it to just a small group of channels.

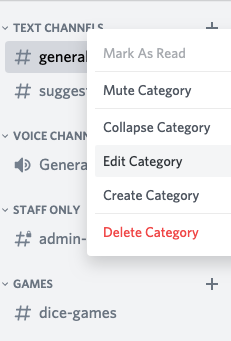
Go back to the previous post, create a Role called GameBots, and add DiceParser to it. Create two Categories, add all the channels you don’t want the bot to work in to one, and the ones you do to the other. In the one you DON’T want the bot to work in, right click on the Category name, and Edit Category:

Now click Permissions in the left Sidebar, and then the + next to Roles. Add the GameBots role you created, scroll down until you fund the Text Messages section (see below), click on the cross next to Send Messages to disable it from sending messages to the channel, and you’re done.

This is a handy trick for other bots as well.

Ok. Enough for now. Back with some fresh Virtual Un-distancing stuff tomorrow.

Posted in Virtual un-distancing | Tagged | 1 Comment

Virtual Un-distancing and De-isolation #2 – configuring Discord

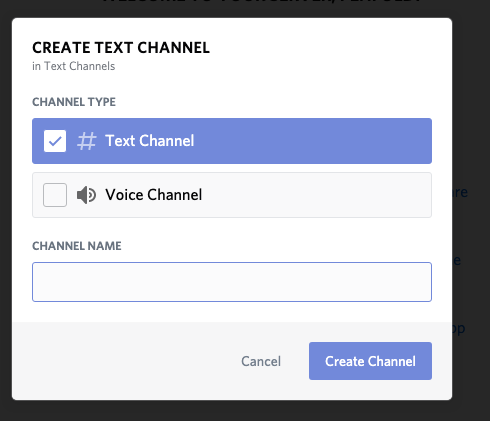
Now you have a Discord server. If (like one or two of the ones I manage) you have a largish group discussing various topics, you might want to add more channels. Easy! Click on the little + next to “Text Channels” and you’ll get a dialog:

Type your channel in there and away you go!

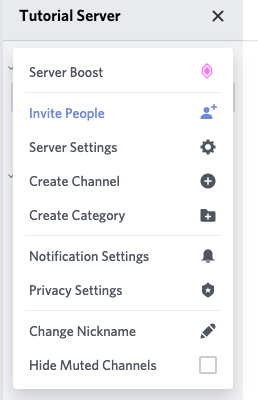
Now, this is fine, but what if you want to restrict the channel to certain people? Again, simple. First off, let’s go to the server menu (click on the downward V top left by your server name).

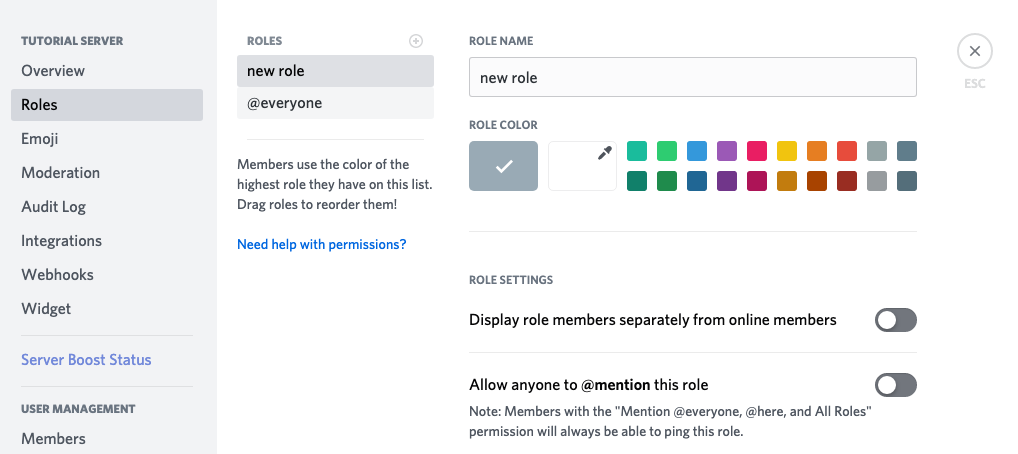
Select ‘Server Settings’ (ignore the others for now), and then Roles, and then the little + just to the right of the ‘ROLES’ in the centre column.

Now you can create a new r么le: give it a name (I chose Admins) and a colour, and for now that’s it – hit the green Save Changes button bottom right and then the close x top right (or the ESC key).

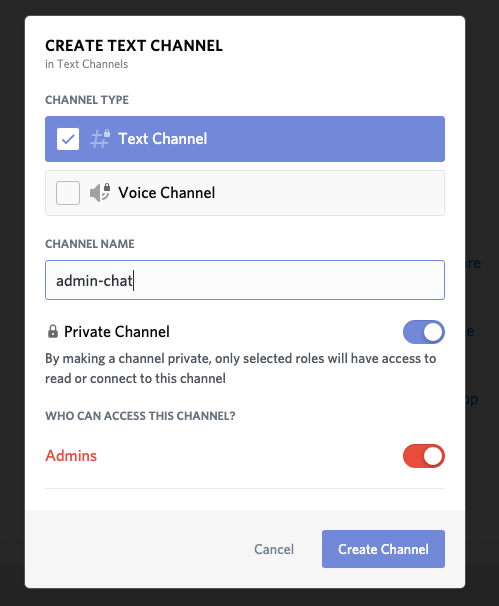
Now let’s create another channel. Because you now have a r么le defined, you can create a Private Channel, which is what we’re going to do.

Select the r么le you want to have access to the channel: everyone else won’t.

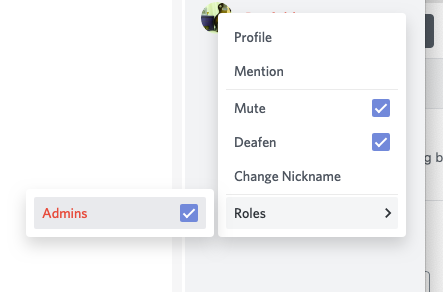
“But wait”, I hear you ask. “How do I give someone a r么le?” Easy. Right click on their name in the user list on the right (or swipe right to display it, tap, and hit Manage on a phone), and then select Roles and check the box for the r么le you want them to have.

All of these also apply to voice channels.

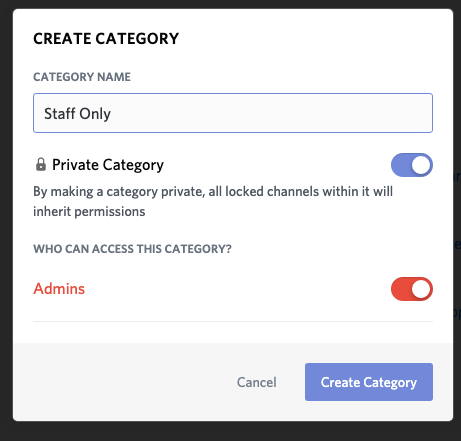
You will notice that your text channels are in a category called ‘Text Channels’. You can add other categories. Go to the server menu, select Create Category:

Categories allow you to group channels together, and more usefully share the same permissions. Notice again, you can make a category private, so any channel in that category will share those permissions.

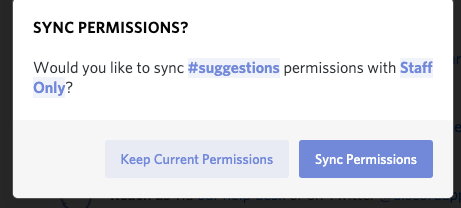
We can also drag any existing channel onto that category, and if it doesn’t already have the same permissions, you will be asked if you want to give it those permissions:

And there you go. I think that’s enough for one post, so we’ll save discussion of bots and such until the next one.

Posted in Virtual un-distancing | Tagged | 1 Comment

Virtual Un-distancing and De-isolation: #1 – Discord

No, I’m not suggesting you immediately head outside and start hugging everyone you meet.

This is a series of posts, for the slightly technical at heart, covering how to set up various means of contacting your fellow human beings, above and beyond the likes of Facebook and Twitter. Not that there’s anything wrong with either of the above, but sometimes it’s good to hear a voice or see a face. With that in mind, then, let’s get cracking.

Discord is a text based chat app (at least on the surface) that started life as an outside-the-game means of video gamers keeping in touch. As such, it also has group voice chat channels, and 1:1 or small group voice and video chat.

Most of the time, you’ll get brought into Discord via an invite link: just click it, create a Discord account (they’re centralised) if you don’t have one already, and off you go. You can survive on the website, or there are clients for computers and tablets.

If you want to create your own server, it’s surprisingly simple:

On almost all the clients, down the bottom of the left hand sidebar is a big plus sign. Click it, select Create A Server, give it a name, and off you go.

Next, you’ll be prompted with a list of friends to invite and also an invite link, like the one you probably got to start your time on Discord. The default link expires after a day, or you can choose to create one with a longer expiry time up to and including never. Guard it relatively jealously, if you’re creating a server for a closed community, so Not Just Anyone can join (I just expired the one below :D)

Click the X to make that go away (you can always find the invite link again if you need to) and there you are – a Discord server with one text channel (#general) and one voice channel (called General as well) and a page of useful links.

Text chat is easy: just type in the channel, and people will see. If you have other folks (who’ve accepted your invite), and you type @, it will auto-complete as you keep typing with people’s nicknames, if you need to get their attention. Note that as well a visible nickname, which you can set per server, there’s a full nickname (usually the first one you picked plus a string of numbers) which is unique across all of Discord.

Text chat is persistent, and you will be able to catch up on what you missed when you weren’t logged in, Also, you can edit and delete posts after the fact, as well as share links and images.

Voice chat requires a mic and speakers, though I’d recommend headphones so the sound from the speakers doesn’t get into your mic. If you right click on the gear icon next to your nickname (bottom left of screen) you can get into Voice and video settings, and set up audio. Down bottom left you’ll also find ‘mute’ and ‘deafen’ icons to turn off your mic and/or audio, and just above it a little handset icon with a cross, which is where you can disconnect from the voice channel.

Next time, I’ll explain about Roles (to restrict who can do what on various channels) and also some useful bots you can invite to your server to help out with various functions.

Posted in Virtual un-distancing | Tagged | Leave a comment

Hello world!

Welcome to altrion.org, the home of Mike and Anne Whitaker on the internet.

For now, this is just a holding page while we move a bunch of stuff over from the old site.

Posted in Admin | Tagged | Leave a comment